The Finale: 3D Printing
- harrenchd
- Aug 7, 2024
- 4 min read

Updated: Aug 9, 2024
Thanks for stopping by! This is the final blog for the ICPD series, gonna miss doing this kinda stuff.
Recap:
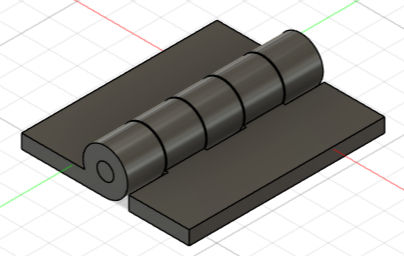
Following the last blog where I created my standing gantry complete with a hinge and compartment for a motor on the Fusion 360 software, it's time to take things to the next level: 3D printing my designs! However, this time, we were to print an artefact that had a moveable joint and had a print time of less than an hour, so I decided to simplify while being more creative with my product. In the end, I came up with making a door hinge (Not a very creative person as you can see).
Advantages of 3D Printing:
But why 3D printing? Why not other technologies to make a hinge? I'll explain. 3D printing is a form of additive technology. This kind of technology makes objects from the ground up, and in the 3D printer's specific case, it prints filament layer by layer on a bed until the printing is done. Think cross-sections of an object made from the bottom to the top. Here's an example to help you understand better!
Very cool 3D printing moment, courtesy of my classmate Anston!
Opposing this is subtractive technology. This is the more commonly used type, since it allows for mass production. Subtractive reduces whole blocks to the desired shape or object. Subtractive technology can be found pretty much anywhere, from laser cutting to something as simple as... scissors? However, it is difficult to replicate a hinge using subtractive technology as it cannot replicate the level of detail that additive manufacturing can for the internal structure of objects. In this situation, it would be something like the gap between the hinge and pin.

Designing the hinge:
Since I pretty much followed the instructions on a Youtube video I watched to complete the design (similar hinge used in blog 3), it was relatively easy to do (thankfully). Here's how I did it! An instructional video is credited at the end of this blog.
General shape (hinge):
I made a sketch with a simple rectangle and circle. However, I felt the height of the rectangle was a bit too tall, so I cut it in half and trimmed the bottom half off using the line and trim function.

3D-fying the sketch:
I then extruded the shape to the desired length, in this case 35mm for the main hinge body and 7mm for the jointed part.

Adding more joints:
To replicate the jointed part while retaining gaps for the other half of the hinge, I used the "Rectangular Pattern" function to add them. I also copied this hinge to make the other half easier to do.
Adjusting the second half:
I made a second similar sketch with only the circles to make the joints using the same rectangular pattern function. I also set the two objects as components to allow for jointing afterwards.

Jointing the two parts:
After rotating the second half 180 degrees to get it to fit into the first half, I used the "Joint" function to connect the two, setting the joint type to "Revolute" to allow the hinges to move about the selected axis.

Making the hinge physically possible:
Since there were some parts that intersected each other when the hinges were connected, I had to use the "Press Pull" function to allow the parts to physically be able to exist before I 3D printed them.
Creating the interlocking pin:
Simplest part so far, I extruded the inner circle to the same length as the hinges, at 35mm.

Extra necessary steps:
Since all the parts were still in contact of each other, when 3D printed, they would stick together and not be able to turn. To avoid this, I used the "Press Pull" function again at each contact point of every component except the one between the first half hinge and the pin.

And we're done!
The pokeball of pain
After making my hinge, I had wanted to create some designs to show that my hinge was a versatile one, being able to be used in different settings. So I decided to make a pokeball that used this very hinge. In the end, it was somewhat of a failed product, but there was a lot that was learned, so I believe that it was a project worth doing.
Here's a pic of the finished sketch!

Pretty cool, huh? Completing this pokeball was the most hyped I was for this project, sadly. When it came to printing, I found out that the hinge was much too small and as a result broke apart from the main body. But at least the initial hinge works! I guess.

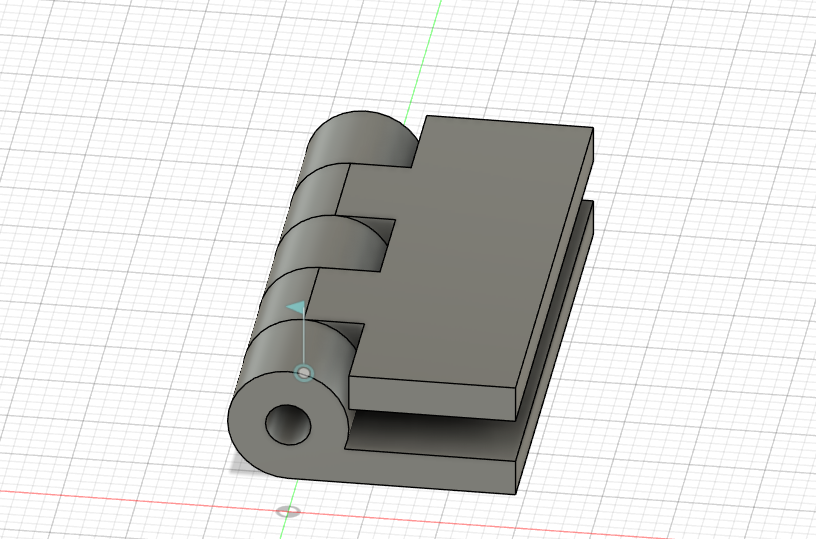
Speaking of failures, I almost forgot about my first print. I forgot to offset the area between the hinge and the pin (offsetting creates the gap as shown earlier), which caused the entire hinge to become a solid piece instead of two jointed pieces. Here's the pic of the non-moving joint. Looks pretty much the same though.
The silver lining is that I successfully made a proper hinge in the end. I managed to put a video showing how it works, but my camera quality is decent at best (or maybe my videography skills) and my fingers are in the way of the hinge, but enjoy this video nevertheless!
Also here's a pic of the failed pokeball. Unlucky.

Since I technically made two designs, I decided to upload both embed files for you guys to play around with. Have fun!
Also, here are the Youtube videos I watched to make my designs possible.
https://www.youtube.com/watch?v=QqM7GLN5lJg - pokeball
Despite all the failures and troubles I went through, I seriously had a fun learning experience! I plan to try and create some designs myself and print them in school during the holidays, with all the extra time on my hands.
If you bothered to read all the way to the end, thanks! I owe you a stack of pancakes.
To those in the same course reading this, good luck for your exams! If you aren't a student, have a great day :)
Signing off,
Hao Dong


Comments