Blog 4: Project Development
- harrenchd
- Feb 26, 2025
- 11 min read

Hey everyone, hope your examinations are going well. Keep on and good luck! Y'all got this.
As all good things come to end, so will this CPDD module. This is the final blog about the tea brewer my team created!
1: TEA REX v1.0
Surprisingly, we decided to go ahead with making a tea brewer, even though some of the other options were objectively easier.
But why?
As a person who prefers tea over coffee, I felt it was a product that I was more familiar with, since I had never used the other chemical devices before (or at least, not that I knew of). With that, we decided to embark on this tea-riffic (sorry bad pun) journey!
The tea brewer was chosen as we wanted to be able to personalize our own tea. That is, to alter the brewing time based on our preferences on the strength of the tea. In this case, steeping the tea for a longer time brings a deeper and richer flavor flavor, while steeping for a shorter time does the opposite. This allows us to experiment with the timings of the tea and find a specific brew time that fits us best!
With that, we move on to the sketches of the tea brewer. Originally, I had plans to make it look similar to a coffee machine, something like this:

So we went ahead with sketching our designs! Here's everything.
Sketch 1

Our first design used a double reservoir to steep tea and contain the hot water separately. This sketch was rather unfeasible due to our budget of $100. Since we were unsure of the cost of a touchscreen (though we already knew it would be rather pricey), we decided to scrap the idea for the moment. We then decided to go for the next idea, sketch 4. Compared to the first sketch, sketch 4 had brewing timer buttons which were significantly cheaper than the touchscreen, though it was definitely less cool lmao.
Sketch 2

This sketch was rather similar to sketch 1, the only major difference being the design and the method of steeping. Up till now, I have next to no idea what a rotary steeping mechanism is. Perhaps something like a reactor, but instead of an impeller stirring the contents, the reactor itself spins? ¯\_(ツ)_/¯
Sketch 3

This one takes a spin on the design of an electric tea brewer, though our design includes a timer to inform the user when the steeping time is over! The problem was making a movable cover for the bottom of the tea brewer as it had to be perfect to prevent any spills and leakages.
Sketch 4

Similar to the design of the second sketch, sketch 4 uses a single reservoir instead to steep the tea! This simplifies the building process of the tea brewer and also makes it easier to access the water container for the user.
Sketch 5

Similarly to sketch 3, this one also alerts the user when steeping is done, though this one uses a touchscreen, which is again, a little pricey. In terms of aesthetics, this was my favorite design, though the rounded shape would be somewhat difficult to create.
2: Team planning

As all groups come to be, we have to allocate roles to our groupmates. For this, we had four major roles: The CEO (Chief Executive Officer), COO (Chief Operating Officer), CSO (Chief Safety Officer) and CFO (Chief Financial Officer). And so, we have our roles!
CEO: Ahravinthan
COO(s): Xavier, Hao Dong
CSO: Qi En
CFO: Chloe
We initially had two CSOs (me being the second) but decided that I should be reallocated to the COO position as it was of utmost importance for the operations to run smoothly, and that one CSO should have been enough to ensure safety in the workplace.
As fast as we finished allocating the roles, we started on creating the Bill Of Materials. But what exactly is that, you may ask?
Crash course: BOM
A Bill Of Materials put simply is a list of parts and components that are required to create a device, which in this case is our tea brewer! To manage our tight budget of $100, we needed to pick materials that were cost effective and also not buy too much of a specific item to prevent waste.
Here's what we came up with initially!

This comprehensive list, while somewhat overwhelming, shows exactly how many different items and how many of each item we require to make our tea brewer! It also includes the cost which shows a total of $79.34, meaning it is way under budget (luckily).
However, we obviously couldn't stop there as there were many ways to improve our design. Although we were thinking of using acrylic for the shell at the start, we soon realized that cutting the acrylic would be next to impossible as hand tools were very impractical, and the laser cutting slots were all fully booked. This meant that we had to swap to a material that was easy to cut with hand tools, inexpensive, strong enough to hold the parts and also easy to adhere with glue? Sounds rather impossible. After extensive research online and painstaking hours of searching in stores (especially in Art Friend), we found nature's solution: Plywood.
Plywood is a material made of multiple wood veneers glued together, and can be made from many different types of wood. I'm not exactly sure what my group used, but I can only assume it to be birch (I think).
Wood yapping aside, we also replaced a few components that were deemed unnecessary or had cheaper alternatives that proved to be just as useful. In the end, we finalized our Bill Of Materials to look something like this:

Saving about $15, we shaved off around 20% of the cost of production! Pretty impressive if you ask me.
After planning the BOM, we also had to create a timeline in which we plan the completion dates of each activity. More specifically, we used the Gantt chart to help us with this task. The Gantt chart, named after its inventor, Henry Gantt, is a type of bar chart that displays a schedule clearly and simply. It might be simpler to show for you guys to understand, so here is my group's Gantt chart.
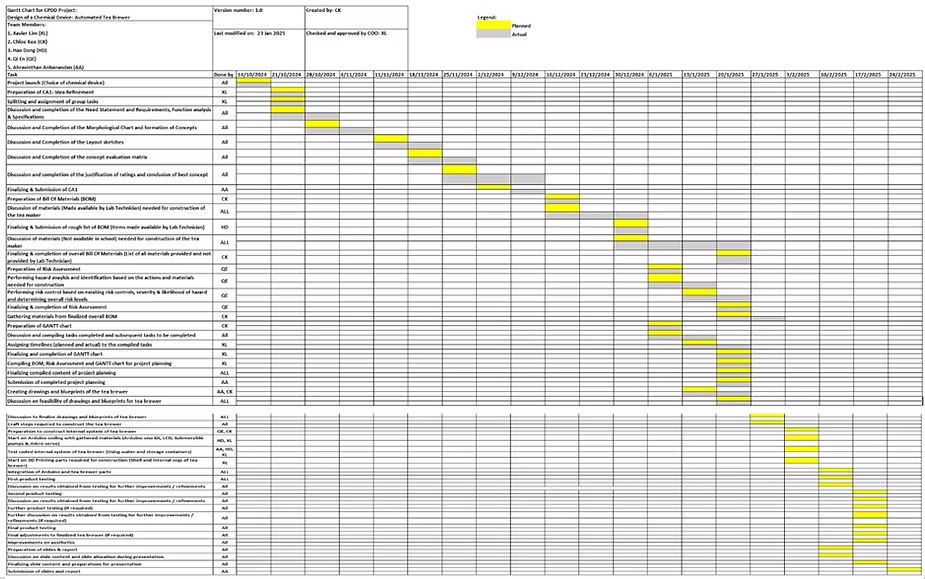
It's a lot to look at, but simply put:
The yellow boxes show the planned dates that we finish each activity, while the grey ones show the dates that we actually finish the task. From the chart, we can see that my group actually finished most of the tasks on time, and even completed some before the planned deadline. Cool!
3: Building and designing our TEA REX
Immediately after planning everything, my group and I went to WORK. Progress at first was incredible, with everyone contributing so much that we were pretty much done with all the separate parts within a few weeks.

Part 1: Planning
Here, we measured the pieces of wood from our sketches to fit the dimensions we had estimated on our sketches. The total size of the tea brewer was around 25x15x33 cm (LxBxH) and we managed to fit all the different sides on the piece of plywood you see in the picture.
We also started on the 3D prints using polylactic acid (PLA). We decided to only print the parts that were more difficult to make using the plywood as PLA was rather expensive to use, which would have increased our budget.

Part 2: Elbow grease
And then we started with the cutting. We used various tools, ranging from the hand saw, penknife, scorer and even the drill. It was a new and fresh experience using these tools which I found interesting, albeit a little scary.
Also, when we were cutting, we realized that the wood pieces sometimes splintered upon breaking, but a quick fix was just sanding in the same direction the splinter came out of. This easily removed the splinters and gave the wood pieces a more refined finish, which also helped when adhering the pieces together using the hot glue gun.
Part 3: 3D Printing
Honestly, I preferred this part compared to the rest, although the most issues arose here, for me at least. We decided to make the gears, hinges and door handles of the tea brewer to be 3D printed to both reduce costs but also make the parts easier to make. After making the 3D models, I chose brim as the build plate adhesion type as I felt it was sufficient enough to adhere the print filament to the glass panel of the 3D printer.
Part 4: Coding

The coding part was mostly done by Xavier, who I have infinitely many thanks to because I could NEVER code for my life. He used painstakingly long hours of his time to code the entire circuit, struggling with the wiring and eventually putting together the circuit after a while.

With the circuit done and with my creation of the melody, we were able to make the circuit from scratch, with a lot of help from external resources such as YouTube and ChatGPT. Honestly, I never know how people code entire operating systems because my patience would not last long enough.
Part 5: Finalization!!!!!!
Putting everything together, we have the TEA REX v1:
Honestly really happy that this managed to work with hot water as we were kind of worried that the hot water would melt the pump tubes.
4: Problems and more problems
So many things went wrong with the construction of the tea brewer that I probably couldn't list them all if I tried. So here's three:
3D Printing
Pain.
Making the 3D models on Fusion was the easy part, albeit time-consuming. I decided to make only the hinges, gear, winch and door handles of the tea brewer to save on costs, since 3D printed parts were expensive and they were difficult to glue on as glue did not adhere well to the prints. After making the models, this is what they looked like:
3D models of the door handle and hinge
3D model of the gear and winch
Model of the tea brewer I made for fun
Although the models looked fine, it was when it was time to print that was the problem. First of all, I had to convert the fusion files (originally f3d) into STL files, then run the Cura application to slice the model and save the model to the thumb drive. All of this went smoothly as well, until it was time to print.

The first time I used the printer, it showed a printing error and I had no idea how to fix it, and asked the kind TEs for help. After a bit of troubleshooting, I tried printing the hinges for a second time. This time, when the print came out, it just looked like a blob of filament, nothing like what I had made in Fusion. Not exactly sure why this happened too, but we move on.
When I printed for the third time, the two separate parts of the hinge were completely stuck together. Funny enough, when I used the 3D printer for the ICPD projects, they came out completely fine. Perhaps it was due to the difference in printers that I used (Bambu in ICPD, Ultimaker in CPDD).
The fourth attempt was honestly my mistake. I forgot to bring the 3D model to the ground which caused it to print in the air...
It looked like a blob at the bottom of the hinge. The rest looked decent though, so yay I guess?

Solution:
Anyways, it was frustrating trying to fix these problems, but I eventually came up with the idea to just adjust the gaps between the knuckles of the hinges so that they wouldn't stick to the pin, which worked! I had to repeat this process 3 more times to finally print all of the hinges. Fortunately for me, the other parts had printed pretty much how I wanted them to. Funny how the things supposed to hold the tea brewer seem to keep breaking.
Wiring
This one was just more annoying than anything. While doing testing for all the parts of the circuit, the wires came off easily. Even after adding electrical tape, we still found that the wires still detached with ease. To solve this, we just added even more electrical tape LOL. This seemed to work, so it was yet another problem solved and a win for the TEA REXES. It was also kind of messy inside the tea brewer due to the density of wires in the
Solution:
Electrical tape, our lord and savior. Tying the wires together with tape seemed to adhere the wires together and also prevented them from falling apart, killing two birds with one stone!
Plywood
The plywood, though easy to cut, was prone to splintering when we broke the pieces apart. This was worsened when we realized that some of the parts were not cut to the dimensions that we wanted, but smaller than intended. Sanding and finishing the wood pieces only further reduced the dimensions of the wood pieces, but since we were running out of material, we had no choice but to use what we were left with. This was a bit troubling as we made the pieces out to fit with each other without any allowances.
Solution:
Combining our brains, we came up with a rather interesting idea: To make use of the thickness of the wood to fit the pieces together. When we were making the sketches and dimensions of the wood pieces, we did not take into account the thickness of each piece, which was about 0.3 cm. This was the allowance that somewhat saved us, as we just used the thickness of the plywood to "extend" the sides of the wood pieces that were too short. This both saved on the need to buy more plywood, but also on the final dimension of the tea brewer.
5: Project Design Files
Probably the most fun part of this blog because I talk too much, here are the files used for my project!
Arduino code used
CPDD: A Reflection
Honestly, even through the ups and downs of this module, product design was a really interesting subject matter. I had a ton of fun experimenting with things throughout the length of this module! I would go so far as to say I enjoyed almost every second. From the interactive lessons and practicals we go through to the classmates I enjoy spending time and joking around with, this was probably my favorite module of Chemical Engineering so far.
Anyways, down to the details: What did I learn from this module?
Teamwork was of utmost importance. This and communication led to the completion of our tea brewer, which was essentially the point of the project. Although we had very effective communication throughout practicals and face-to-face, when it came to discussing the project online, no one really took initiative, which hindered our progress slightly. If we had effective communication online, we would be unstoppable.
Secondly, adaptability was a strong trait to have here. Whenever we encountered problems, we had to think on the spot and try to troubleshoot things as we went. If we were to stop whenever we had a problem at hand, we probably would not be able to finish the prototype by the time the deadline arrived. It was thanks to my team that we were really able to solve problems on the go and even make changes to our product when we had alternative ideas.
Lastly, I think the skills we learnt from this module were very complementary to what we were doing. I think this is rather self-explanatory since the past few paragraphs have been nothing but 3D printing and lines of code. Other than that, there were hands-on skills such as sawing and sanding, which I think is a good skill to have (may or may not be biased because I enjoy this kind of stuff).
All in all, cool module! I hope everyone doing this had as much fun as I did. Good luck to everyone taking their examinations, have a good holiday, and thanks for reading!


Comments